A recipe tells you to stir the dough "until it just comes together." That single sentence has ruined more batches of scones than a cold oven ever has. It sounds precise, but it describes something you have never seen before, and by the time you recognise it, the dough is usually past the point of no return.
So let's replace the words with textures. There are five you will meet between the bowl and the baking sheet, and once you know what each one looks and feels like, you can stop reading the recipe and start trusting your hands instead.
Why Scone Dough Is Not Bread Dough
Bread wants a strong web of gluten — that's what holds the gas in and gives you a chew. Scones want the opposite. You are building a barely connected, layered structure, held together by cold fat and just enough liquid to make it cooperate. Every minute you handle the dough, that web gets stronger: your scones rise a little taller and turn out a lot tougher.
That's why the textures below matter. Each one is a rough measure of how much gluten you've developed and how much you haven't. Too little and the dough won't hold its shape. Too much and you've made a biscuit that fights back.
Texture One: Shaggy
This is the moment right after you pour the liquid into the dry ingredients. The mixture is loose and uneven. You'll see dry streaks of flour, a few darker patches where the cream has soaked in, and clumps about the size of walnuts. Nothing holds together — squeeze a handful and it crumbles apart in your palm.
Feel it: cold, loose, no resistance at all. There's no gluten doing anything yet, and that's correct. Put the spoon down and turn the whole mess out onto the bench. Do not add more liquid here. Most beginners panic at this stage and pour, which is how a shaggy dough becomes a sticky one.
Texture Two: Clumpy With Damp Patches
After two or three folds with a bench scraper or your fingertips, the picture changes. Roughly two-thirds of the flour is now damp. You'll see distinct dry pockets sitting next to wetter, darker clumps, and flecks of butter still visible throughout. The dough feels cold and slightly tacky where it's wet, dry and floury elsewhere.
This is the stage to fold the dry bits into the damp ones, not to knead. Slide your scraper under one side, lift, fold it over the middle, turn the pile a quarter turn, repeat. If after five or six folds you still have loose flour that refuses to join in, sprinkle liquid a teaspoon at a time — never a splash. On humid days you'll need less; on dry winter days, a little more.
Texture Three: Cobbled
Now it's starting to look like something. The dough comes together into big soft lumps, some the size of your fist, holding their shape when pressed but breaking apart if you pull. Lift the mound and it stays mostly in one piece rather than sticking to the bench. Visually it looks like cold cookie dough that's slightly under-mixed.
Butter streaks should still be visible. If they've disappeared, you've handled it too much — those streaks are the layers. Give it three or four more folds here, then shape it into a rough disk with your hands, pressing rather than rolling.
Texture Four: Just-Held-Together (Your Target)
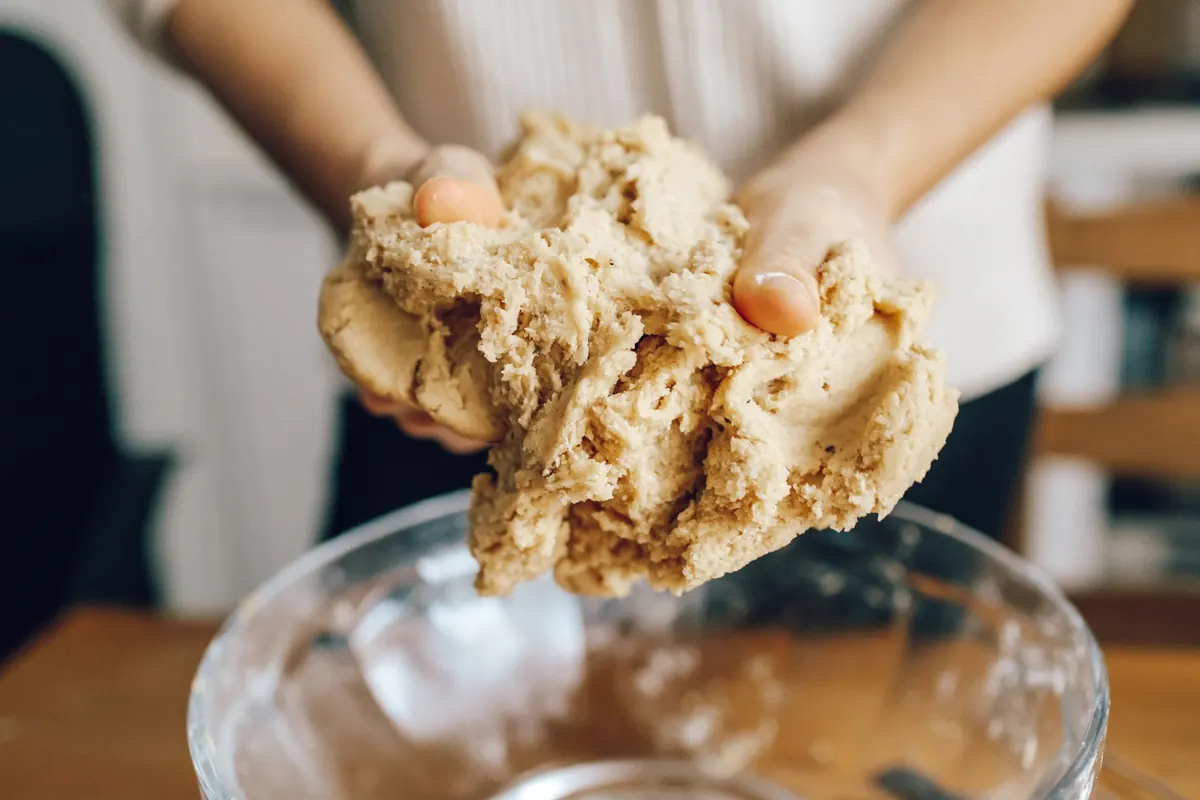
This is the one to memorise. The dough forms a rough disk with an uneven surface and ragged edges, cracks and fault lines across the top. It does not look smooth or glossy, and it should not spring back when you poke it. Those cracks are good — they mark where the layers will split and flare in the oven.
Feel it: firm enough to lift with both hands without sagging, barely tacky, not sticky. Press a lump and it holds the shape of your fingers. Rub your palm across the top and almost nothing comes away. If your hand comes away coated, pat in a spoonful of flour. If the edges crumble when you cut, that's normal too; scones are supposed to look a bit rough.
Stop here. Every fold past this point costs you flakiness.
Texture Five: Smooth and Springy
If the dough is smooth, uniform, slightly shiny and pushes back when you press it, you've gone too far. It also tends to feel warmer and more resistant under your hand. You'll know for certain after baking: the scones rise well but eat tight and tough, with a fine crumb instead of visible layers.
There's no fixing it. You can't undo developed gluten. Cut and bake the batch anyway, then note how much handling it took so you can cut that in half next time. If your dough ever feels warm at all, chill it for fifteen minutes before cutting — cold dough holds its shape and gives a cleaner rise.
A Quick Checklist From Bowl to Bench
- Shaggy: loose flour, walnut clumps, crumbles when squeezed. Move it to the bench.
- Clumpy: dry patches beside damp ones, butter flecks visible. Fold, don't knead.
- Cobbled: fist-sized lumps, holds when pressed, breaks when pulled. Three or four more folds.
- Just-held-together: rough disk, ragged edges, cracks on top, barely tacky. Stop.
- Smooth and springy: shiny, elastic, warm. Stop immediately and bake anyway.
Two quick tests carry you through all five: the squeeze test (does a handful hold or crumble?) and the palm test (does dough come off on your hand?). When a handful holds and your palm stays clean, you're there.
Getting the Feel Before You Bake
Reading about texture only gets you so far. The fastest way to learn is to make one batch and deliberately study it. Before your final fold, pinch off a walnut-sized piece, roll it smooth in your palm until it's glossy, and set it on the baking sheet next to the real scones. Bake them together, then compare.
The smooth nugget will be dense, chewy and pale — a small, edible lesson in what overworking does. The scones beside it should be layered and easy to pull apart. Do this once or twice and you'll stop measuring your dough against a recipe and start judging it by hand, which is how every good scone baker I know actually works.
Keep everything cold, work quickly, and err on the side of less. A slightly underworked scone is a good scone. An overworked one is just a biscuit with regrets.
Photo: fotoblend / Pixabay